
Most of us rely on our car every day. We use it to get to work, go to the grocery store, and pick up the kids from school or practice without any hiccups. But cars are machines that undergo an incredible amount of wear and tear. From door dings to potholes to extreme weather conditions, your car endures it all. That’s why it’s so important to perform regular maintenance check-ups, as catching something early could be the difference between a quick fix and a bank-breaking full-service repair.
That’s why we created this guide to basic car maintenance tips. Anyone can do these 10 easy maintenance steps in their driveway with minimal tools, at little cost. Don’t worry, you don’t need to be an expert — even just understanding your car can go a long way. Performing these check ups on a regular basis can add thousands of miles to your car’s life and save you some serious cash.
Check your car’s service manual for timelines on when you should replace fluids and do regular maintenance. Your service manual will also tell you which specific products to use when tackling these projects.
How to check your oil
Tools you need: clean rag
Time to complete: 5 minutes
Estimated cost: $0
Oil lubricates major components in your engine, keeping them safe from wear and tear. Ensuring your engine has a sufficient amount of oil can save you thousands of dollars.
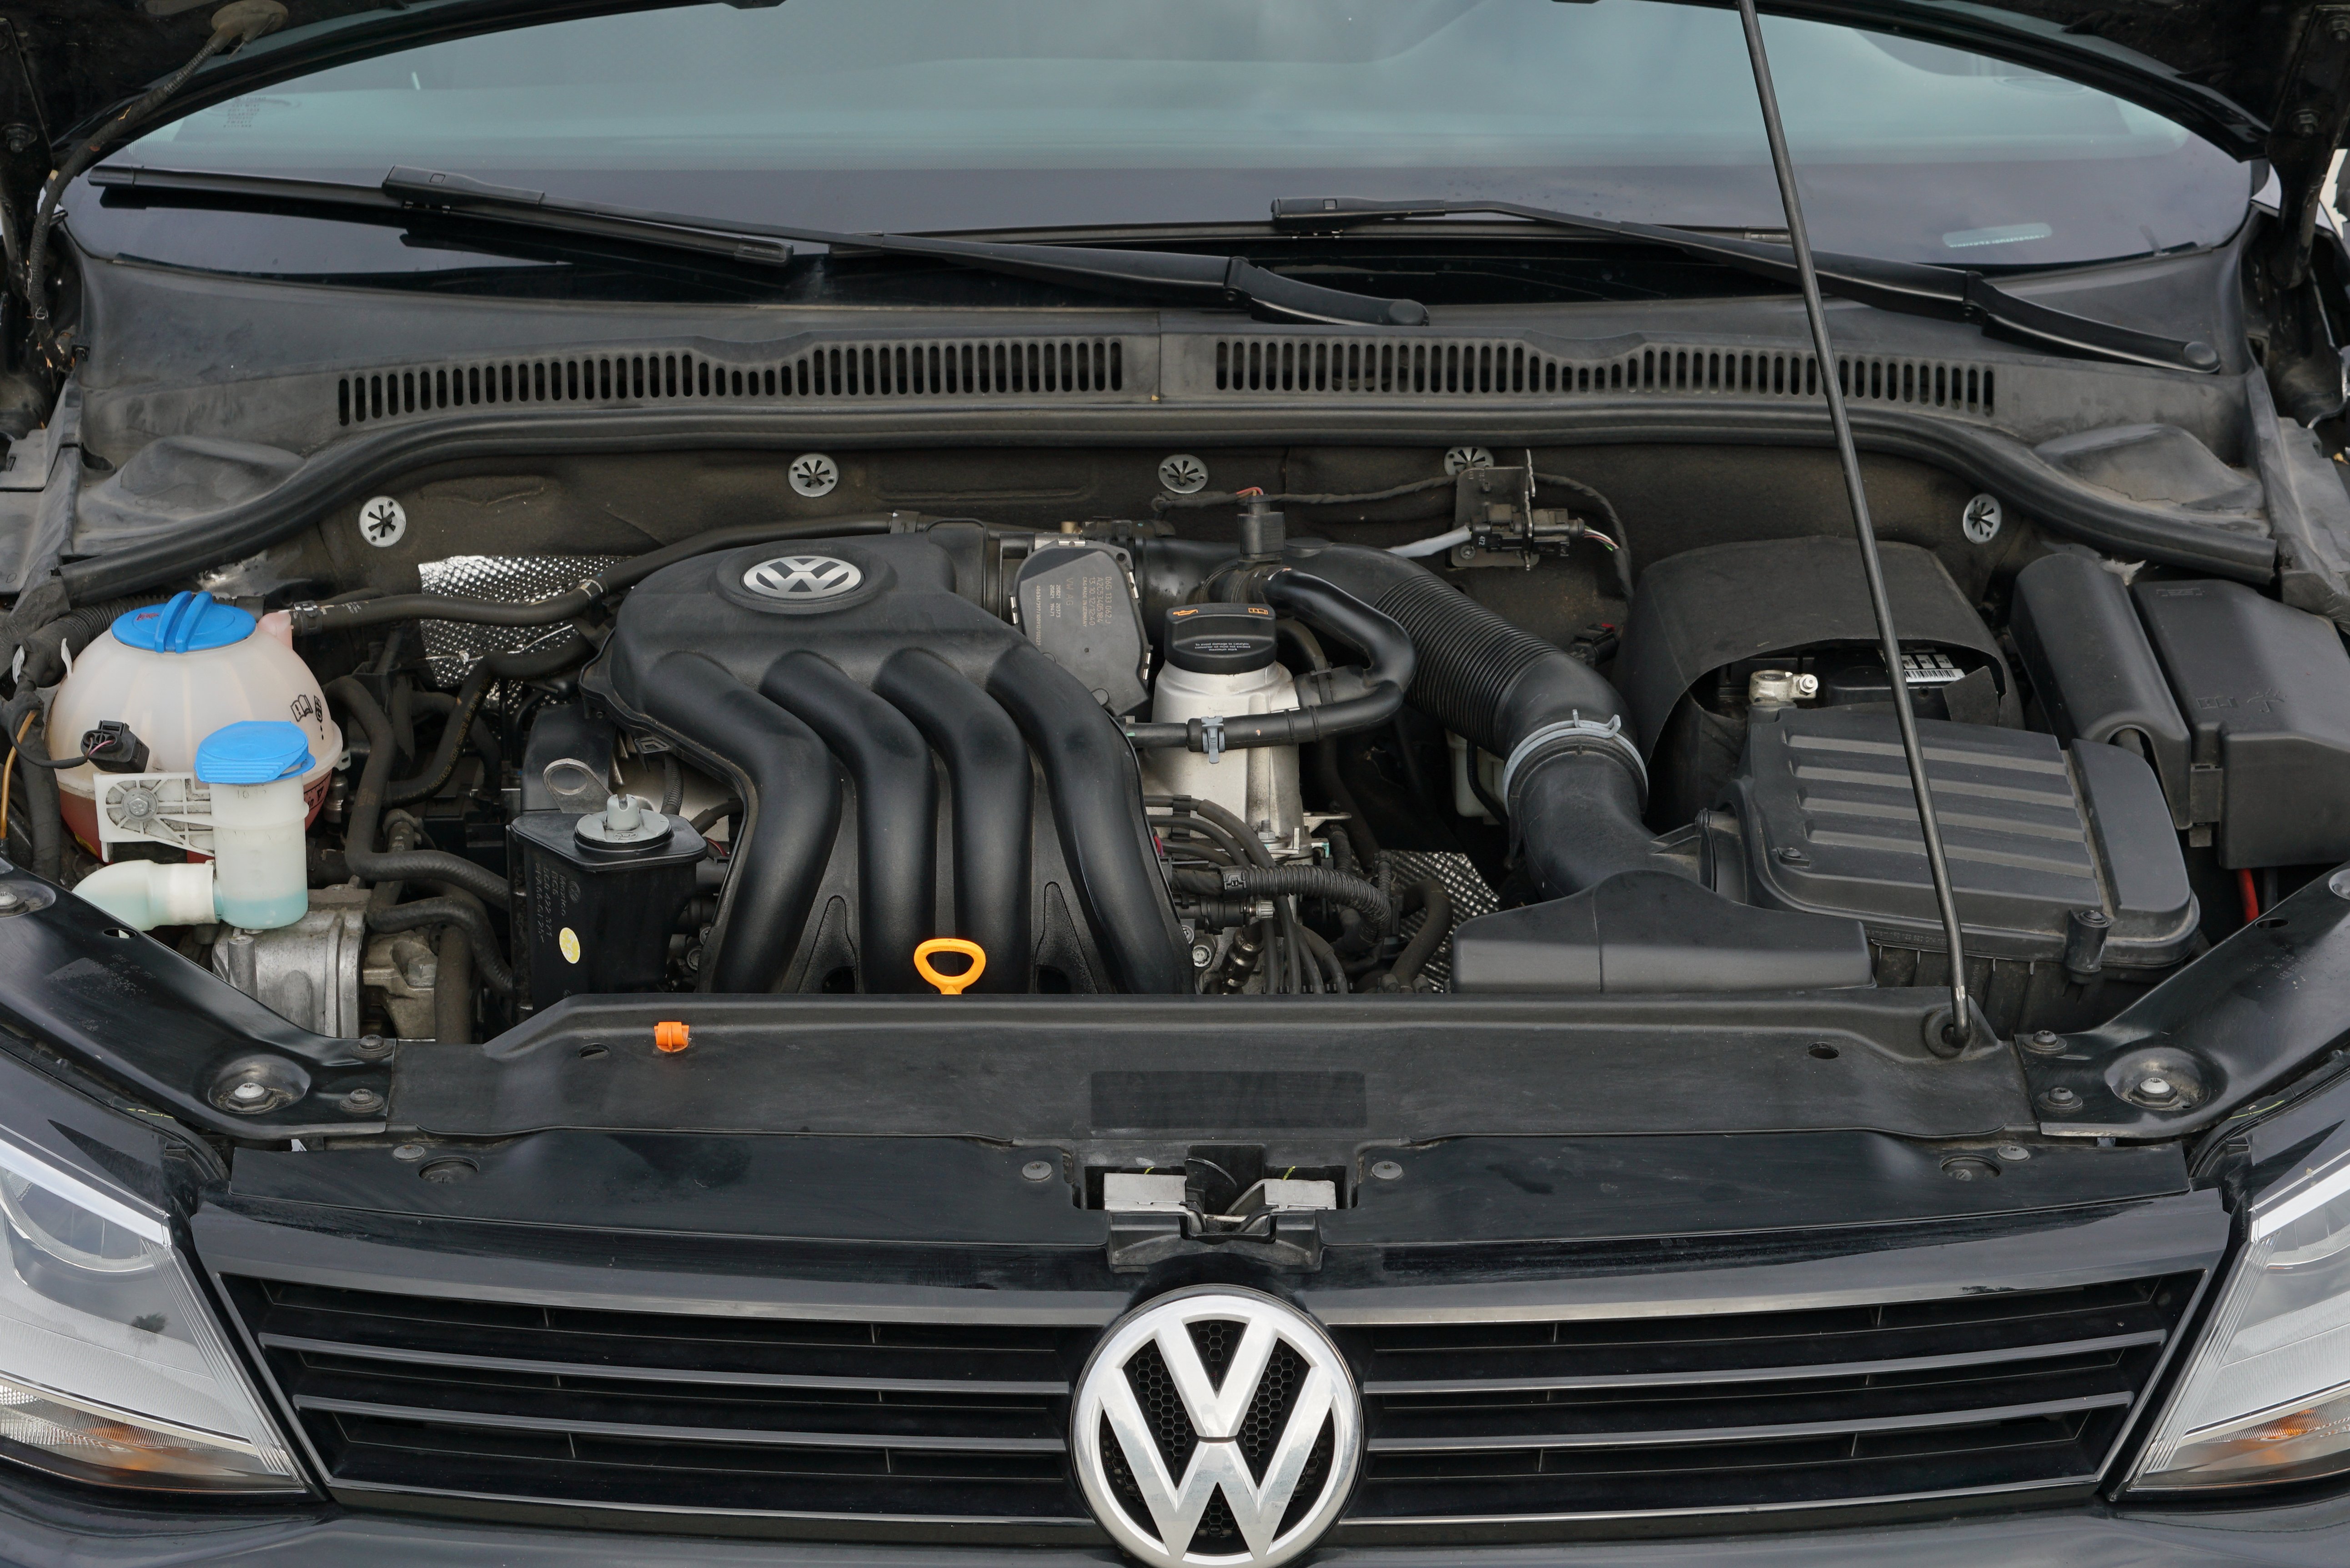
To check your oil, open the hood of your car and locate the top of the dipstick. It is a small yellow loop that you pull to reveal the rest of the dipstick. The dipstick is a long, thin metal rod with the sole purpose of helping you measure the oil in your tank. The dipstick has two lines near its very bottom, one indicating ‘low,’ and another indicating ‘full.’ Remove the dipstick fully, wipe it with a clean rag, and insert the dipstick back into the oil fill port.
Doing so will give you an accurate reading on your dipstick. Pull the dipstick back out and check the measuring lines at the end. If the oil comes up to the line that says ‘full,’ you’re good to go! If the oil still shows that it’s running low, head to the dealership or a trusted mechanic to locate the underlying issue.
How to check your tire pressure
Tools you need: tire gauge
Time to complete: 5 minutes
Estimated cost: $5
Tire pressure is very important. If your tire is running low on air, its tread will wear unevenly. This can result in serious issues, including a tire blowout while driving. The good news is, checking your tire pressure is incredibly easy!
First, consult the owner’s manual to find your car’s recommended tire pressure. Most cars also have a sticker on the inside of the driver’s door that tells you the proper tire pressure reading. Then, locate the valve stem on the suspect tire and remove the valve cap. Take your tire pressure gauge and press it onto the valve. Check the reading on your tire pressure gauge. If it’s low, add air at a gas station or anywhere with an air compressor.
If you notice your tire loses pressure consistently, take it into a tire shop. If you catch a tire puncture early, you might be able to have it patched. If you drive on a punctured tire for too long, you will need to replace the tire. You also run the risk of damaging the wheel, and replacing a wheel will cost much more than replacing a tire.
How to check your tire tread using the quarter test
Tools you need: a quarter
Time to complete: 5 minutes
Estimated cost: 25¢
Your tire tread is something you should check regularly. Driving on tires with low tread puts you and other drivers at risk. Driving with bald tires can lead to a blown tire, negatively impact your stopping ability, and increase your risk of hydroplaning on a wet road.
To measure your tire’s tread depth, take a quarter and place it with Washington’s head upside down, in the groove of the tread. If any part of Washington’s head is covered by the tread, you have more than 1/8th-inch of tread left. That’s good news! If all of Washington’s head is showing, your tire is running low on tread and you should make an appointment at your local tire shop.
How to check your air filter
Tools you need: Phillips-head screwdriver, hose clamp pliers
Time to complete: 10–15 minutes
Estimated cost: $15
Your engine's air filter prevents harmful debris like bugs, dirt and other contaminants from entering the engine. A dirty air filter prevents the engine from getting clean air, which can affect your gas mileage and your emissions.
To check your air filter, open your hood and unclip your air intake at the front of the engine bay. Then, take your hose clamp pliers and use them to remove the hose clamp. This will allow you to disconnect the intake hose from the air box. Next, you’ll lift the airbox off the engine by firmly but carefully lifting it off the engine.
You’ll need to remove the screws on the underside of the air box in order to access the air filter. Once you’ve loosened the screws, pull the air filter housing back. Then pull your air filter out and inspect it. If it looks dirty, replace it with a new one by inserting the new air filter into the air filter housing.
How to refill your windshield washer fluid
Tools you need: windshield washer fluid
Time to complete: 10 minutes
Estimated cost: $3
Windshield washer fluid is something you don’t think twice about until it’s gone. Having washer fluid is helpful when grime and debris accumulate on your windshield, affecting visibility and safety.
When purchasing windshield washer fluid, make sure the product you purchase is appropriate for your region’s weather. Certain windshield washer fluid types have different freezing points — be sure to get the correct type for you.
To refill your windshield washer fluid, open the hood and locate the windshield washer fluid bottle. It has a blue top and a windshield icon. Simply pour the windshield washer fluid into the washer bottle and replace the cap. Then close the hood and congratulate yourself on a job well done!
How to replace your windshield wipers
Tools you need: two new windshield wipers
Time to complete: 15-20 minutes
Estimated cost: $20-$30
Good windshield wipers are crucial. If your wipers are leaving streaks or coming off the wiper arm, it’s probably time to get them replaced.
Pick up a new set of wipers at your local auto parts store. Make sure the wipers fit your vehicle by asking a store representative for help choosing the proper product. You can also look up the proper windshield wipers in your service manual. Replacing your wipers is easy: you should be able to accomplish it in the store's parking lot.
Pull the wiper arms away from the windshield and press the small dot on the wiper arm. While holding the dot, pull the wiper up and away from the wiper arm. It will slide out easily. Then, put the new wiper on by pushing it into the wiper arm until it latches securely.
How to check your coolant level
Tools you need: rag
Time to complete: 10 minutes (you may need to wait at least 1 hour for car to cool down)
Estimated cost: None
Without coolant, your engine would become too hot to function. The metal in your engine could then warp, resulting in catastrophic failure. Thankfully, coolant flows through your engine to keep it running at an optimal temperature.
When your engine runs low on coolant, it can be a sign of underlying malfunctions. Checking your coolant level is crucial to the longevity of your car and can help you catch a problem before it becomes serious.
To check your coolant level, first make sure your car has been sitting with the engine off for at least an hour. This step is very important because coolant gets incredibly hot and builds pressure when your car is running. If you were to open your coolant cap with pressure still inside the engine, you would run the risk of serious injury.
Open the hood and locate the coolant expansion tank. It is a clear bottle with a coolant icon on the cap. The coolant icon looks like a little thermometer on top of liquid. The tank will have a level indicator on its side. If the fluid is at or below the lowest level marker, add coolant until it reaches the 'full' level.
How to check your power steering fluid
Tools you need: power steering fluid
Time to complete: 5 minutes
Estimated cost: $10
When you turn the wheel hard to the left or right do you hear a weird whine? That probably means your power steering fluid is running low.
Power steering makes turning the steering wheel near effortless. If you lose power steering, you will have to turn the steering wheel with enough strength to manually turn the wheels on your car. Anyone who has ever had to deal with this knows it’s not easy!
Locate the power steering fluid cap by finding the cap that says “power steering fluid,” remove it and wipe off the level. Reinsert the level and hold it there for a second. Remove the cap and level again and check the reading. If it shows that your power steering fluid is low, simply add power steering into the reservoir and you’re good to go!
How to replace your headlight
Tools you need: Phillips-head screwdriver, new headlight bulb, rubber gloves
Time to complete: 10 minutes
Estimated cost: $50–$150
If your headlight goes out, don’t worry. Replacing your headlight is a simple fix!
Open your hood and locate the back of your headlight. A dust cover may need to be twisted off. After you access the back of the headlight, reach down and gently remove the power connector from the headlight. Then, twist the headlight housing until it loosens. Pull out the headlight housing and headlight bulb. Using a flathead screwdriver, pop the headlight bulb out of the harness.
If you’re worried about whether your high beam or low beam headlights are out, almost all modern cars will have one bulb for both. If you have an older car, you may need two headlight bulbs. You can double check this in your service manual or by asking your local auto parts store technician.
Before handling your new headlight bulb, be sure you’re wearing rubber gloves. Getting any type of grease or oil on the bulb can lead to premature failure of the bulb. Take your new headlight bulb and insert it into the headlight harness. Then, slide the bulb and harness back into its location in the headlight housing. Twist it until it locks securely. Turn the car on and check to make sure your new headlight works properly before driving.
How to replace your tail light
Tools you need: Phillips-head screwdriver, new tail light bulb
Time to complete: 10 minutes
Estimated cost: $5
If your tail light goes out, you’ll want to replace it immediately. Not only is your brake light an important indicator for other drivers on the road, driving with a malfunctioning brake light is an easy way to get pulled over. Some cars have signals to let you know if you have a tail light out, but not all cars do. That’s why it’s good to periodically check that all of your lights are in good working condition.
To replace your tail light, open your trunk and locate the back of the tail light. You will see a tab in the lining of your trunk that allows you access to the back of the tail light. Remove the tail light housing by pressing on the tabs at either side and pulling it out. Once you have the tail light housing out, gently push down on the bulb and turn counterclockwise until it comes loose. Then, put the new tail light bulb into the housing and put the housing back into its holder in the chassis of the car.
You don’t need to be an expert to keep your car running soundly. Just follow these basic maintenance tips to save time and money. To save even more, be sure to do your research to find the best car insurance options available.
Ready to start saving?